
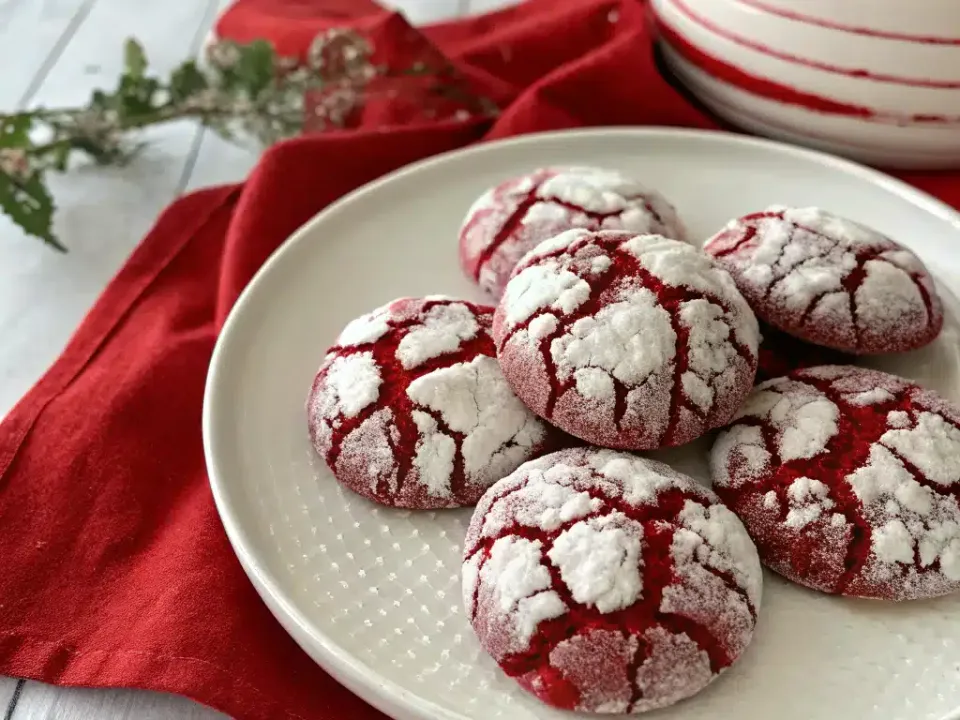
Red velvet in cookie form, with the brownie-like centre the name promises and a properly dramatic cracked top.
About an hour and twenty minutes in total, and forty-five of those are the dough sitting in the fridge doing the work.
Why This Recipe Works
- Two tablespoons of neutral oil alongside the butter is the fudginess. Butter alone sets firm as it cools; the oil stays liquid and keeps the centre soft the next day.
- Gel food colouring rather than liquid means a deep red without adding moisture to a dough whose texture is already carefully balanced.
- Both sugars are there for different reasons — granulated for spread and crisp edges, brown for moisture and chew.
- Pulling the cookies while the centres still look slightly underdone is deliberate. They carry on setting on the sheet, and baking to a done-looking centre is what turns a fudgy cookie into a dry one.
Four Things Make the Crack
A crinkle cookie is a cookie that splits its own coating as it rises. Every one of these four steps contributes to that, and dropping any one of them gives you a red cookie with a smooth white top.
Cream properlyPale and visibly fluffy
Butter with both sugars, beaten pale and fluffy for two to three minutes. That is air being forced into the fat, and it is the lift that later pushes the surface apart.
Vinegar with the leavenersOne teaspoon, no more
A teaspoon of distilled white vinegar goes in with the vanilla. It brightens the cocoa and reacts with the baking soda for a second push — the same chemistry that makes red velvet red velvet rather than chocolate.
Chill until firmFirm enough to scoop into a ball
At least 45 minutes and up to 48 hours. A cold dough spreads slowly, so the surface sets while the middle is still rising — and a surface that sets before the rise finishes is a surface that has to crack.
Coat twice, powdered lastA thick, opaque white coat
Granulated sugar first, then a thorough roll in confectioners' sugar. The granulated layer stops the powdered sugar dissolving into the dough, which is why the white stays stark instead of going pink and patchy.
Ingredient Notes
- Red gel food colouring
- One to two teaspoons. Gel rather than liquid: liquid colour at this strength would add enough water to change how the dough spreads.
- Distilled white vinegar
- One teaspoon, and easy to dismiss. It is doing real chemistry with the baking soda and it is part of what red velvet means.
- Neutral oil
- Two tablespoons alongside three quarters of a cup of butter. The oil is what keeps the centres fudgy once cooled.
- Sugar for coating
- Half a cup granulated and one cup confectioners', in separate bowls. Both, in that order — this is not one step with a choice in it.
How to Make It
Whisk the dry mix
In a medium bowl, whisk the flour, cocoa powder, baking powder, baking soda and salt. Cocoa clumps, so break it up thoroughly for an even bake.
Cream the butter and sugars
Beat the softened butter with the granulated and light brown sugars until pale and fluffy, about 2 to 3 minutes, then beat in the neutral oil.
Add eggs, vanilla and vinegar
Beat in the eggs one at a time until fully incorporated, then add the vanilla and the teaspoon of distilled white vinegar.
Colour
Add the red gel food colouring a little at a time until the dough is a vibrant, deep red. Gel is potent, so it takes less than liquid colour would.
Combine
Add the dry ingredients to the wet on low speed until just combined — overmixing toughens the cookie. Fold in the white chocolate chips if using.
Chill
Cover and chill at least 45 minutes, or up to 48 hours. After an overnight chill, let the dough sit 10 to 15 minutes to become scoopable again.
Double-coat
Set out two shallow bowls, one of granulated sugar and one of confectioners' sugar. Scoop 1.5-tablespoon portions, roll each into a ball, coat generously in granulated sugar, then thoroughly in confectioners' sugar.
Bake
Arrange well spaced on a parchment-lined sheet and bake at 350°F (175°C) for 10 to 12 minutes. Look for set edges and centres that are puffed and slightly underdone.
Cool
Let them finish setting on the sheet before moving them.
Success Tips
- Do not skip the chill. Warm dough spreads before it rises and never cracks.
- Roll in granulated sugar first. Powdered sugar straight onto dough dissolves and goes pink.
- Be generous with the powdered sugar. A thin coat disappears in the oven.
- Take them out looking slightly underdone in the middle.
Serving Ideas
A holiday cookie plate, where the white-on-red contrast does the work. They hold their look well for a day or two, which is more than most decorated cookies manage.
Storage and Reheating
Refrigerate
Airtight at room temperature up to 5 days. The powdered sugar softens slightly but the crackle stays visible.
Freeze
Freeze the coated dough balls up to 3 months and bake from frozen with a minute or two extra. This is the better make-ahead than freezing baked cookies.
Reheat
Not needed, though ten seconds in a microwave brings the centre back to something close to fresh.
Frequently Asked Questions
Why did my cookies not crack?
Usually dough that was not cold enough, or too thin a coat of powdered sugar. The crack is the surface splitting as the cookie rises, so it needs a set surface and a visible white layer to split. Under-creaming the butter and sugars also removes some of the lift that causes it.
Are the white chocolate chips necessary?
No — they are optional. They add sweetness and pockets of contrast, but the cookie's texture does not depend on them.
Can I make them without food colouring?
The cookies will taste the same and come out a deep cocoa brown. The colour does no structural work; you lose the look rather than the recipe.