
Dinner
Delicious Baked Pears with Berries, Honey, Walnuts & Blue Cheese Recipe

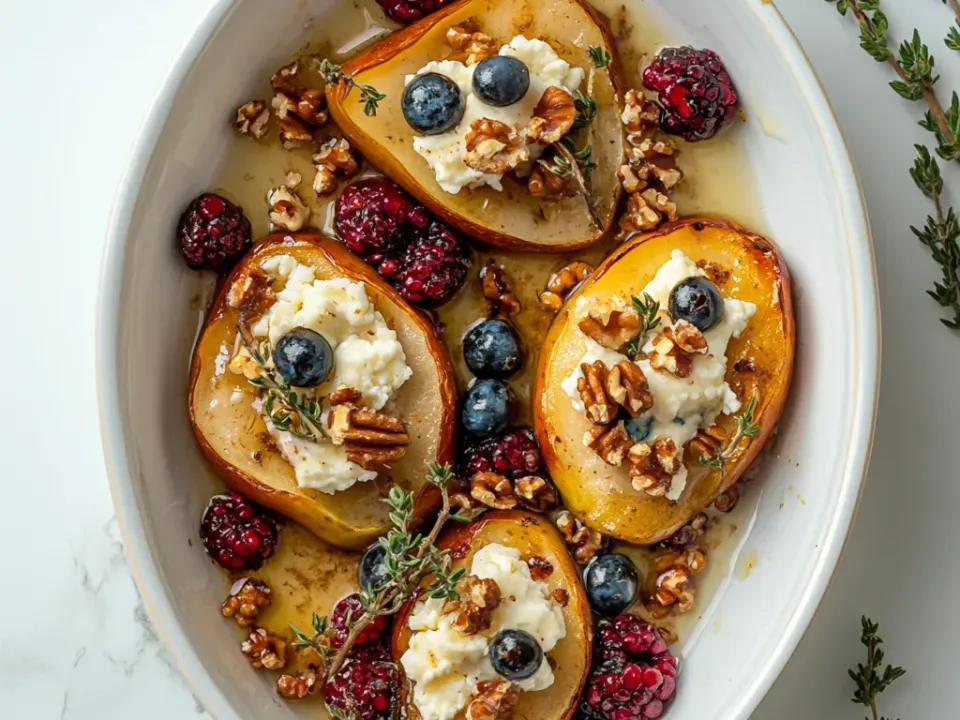
There’s something magical about the way a warm, baked pear transforms in the oven, softening into a luscious, tender vessel for sweet and savory toppings. These Baked Pears with Berries, Honey, Walnuts & Blue Cheese bring together a symphony of flavors that dance on your palate—juicy fruit, tangy cheese, crunchy nuts, and sweet honey.
I discovered this recipe during a fall weekend at my sister’s countryside cottage, where we gathered around her rustic wooden table as rain tapped gently against the windows. The aroma of baking pears filled the kitchen with a warm, spiced perfume that still takes me back to that cozy evening. This elegant yet simple dessert (or appetizer!) requires minimal effort but delivers maximum impact for any gathering or quiet night in.
Table of Contents
Recipe
Why You’ll Love This Baked Pears with Berries, Honey, Walnuts & Blue Cheese
A Perfect Balance of Flavors and Textures
The magic of this dish lies in its perfect harmony of contrasts. Each bite delivers the warm, tender sweetness of baked pears against the sharp, tangy punch of blue cheese. The berries burst with bright acidity while honey drizzles down with its floral sweetness. And those toasted walnuts? They add the essential crunch that makes every mouthful interesting. I love watching guests take their first bite—there’s always that moment of surprised delight when all the flavors come together. This dish bridges the gap between sweet and savory in a way that feels both comforting and sophisticated, making it perfect for those nights when you want something a little special without hours in the kitchen.
Effortlessly Elegant Yet Simple
You know those recipes that look like you spent hours laboring but actually came together in minutes? This is one of those kitchen magic tricks. The pears do most of the work themselves, transforming in the oven while you attend to other things. The assembly is intuitive and forgiving—a drizzle here, a sprinkle there—no precise measurements needed. I’ve made these on harried weeknights and for impromptu gatherings when a friend texted they were “just in the neighborhood.”
The presentation always impresses, with the golden pears nestled on plates, colorful berries scattered around, and that gorgeous honey catching the light. It’s the kind of dish that makes people think you’re a culinary genius, and I’m certainly not going to correct them!
Essential Tips & Tricks
Selecting and Preparing the Perfect Pears
The foundation of this dish is choosing pears with the right ripeness—they should yield slightly to gentle pressure but still hold their shape. Bosc and Anjou varieties work beautifully with their firm flesh and subtle sweetness. When preparing, leave the stem intact for that rustic, elegant look, and create a flat bottom by slicing a small piece off so they sit upright without wobbling.
I’ve learned (through several tippy disasters) that coring from the bottom up with a melon baller creates the perfect hollow for fillings without compromising the pear’s structure. A light brush of lemon juice prevents browning and adds a subtle brightness that balances the rich toppings. Remember, uniformly sized pears will cook evenly, preventing some from turning to mush while others remain too firm.
The Art of Flavor Layering
The magic happens in how you build your flavor profile. Start by sprinkling a tiny pinch of salt inside each pear cavity—it sounds counterintuitive for a sweet dish, but it heightens all the other flavors. When selecting blue cheese, consider the strength—a milder Gorgonzola Dolce melts beautifully and won’t overwhelm, while a robust Stilton creates a more dramatic contrast. For the honey, try reaching for something special like lavender or orange blossom honey that adds another dimension of flavor.
Toast those walnuts until they’re fragrant before chopping—it takes just 5 minutes but transforms their flavor completely. And don’t add the berries until the last few minutes of baking; they’ll maintain their shape and vibrant color while still releasing their juicy goodness.
Serving Ideas & Creative Variations
From Elegant Dessert to Stunning Appetizer
These versatile pears effortlessly transition between courses depending on how you present them. For a sophisticated dessert, serve warm with a small scoop of vanilla bean ice cream that slowly melts into the honey and berry juices. If you’re feeling indulgent, a drizzle of aged balsamic reduction creates a restaurant-worthy plate.
As an appetizer, pair with a glass of prosecco or crisp white wine, and serve alongside thin slices of crusty bread to scoop up the melted cheese and juices. I once served these at a holiday gathering on a large wooden board surrounded by fresh figs, additional cheese, and honey—guests couldn’t stop talking about it! For brunch, they’re surprisingly perfect alongside savory breakfast casseroles for that sweet-savory balance.
Seasonal and Dietary Adaptations
The beauty of this recipe lies in its flexible framework that adapts to seasons and dietary needs. In summer, swap berries for stone fruit like peaches or nectarines. Fall calls for cranberries with a sprinkle of cinnamon and maple syrup instead of honey. For dairy-free guests, replace blue cheese with a dollop of coconut yogurt mixed with a touch of maple syrup, or try a cashew-based vegan cheese. Nut allergies? Pepitas or sunflower seeds provide that essential crunch without compromising safety.
I’ve made these for my gluten-sensitive friend by ensuring all ingredients are certified gluten-free (some blue cheeses can contain trace gluten). The recipe even works with firm apples when pears aren’t in season—just adjust the baking time down slightly as apples tend to cook faster.

Storage & Troubleshooting Guide
Making Ahead and Preserving Freshness
These baked pears are at their absolute best when served warm from the oven, but that doesn’t mean you can’t prepare elements ahead of time. Core and prepare the pears up to 8 hours before baking—just brush generously with lemon juice and store covered in the refrigerator to prevent browning. The walnut and cheese mixture can be combined a day ahead and kept chilled.
For leftovers (though I rarely have any!), store in an airtight container in the refrigerator for up to 2 days. To reheat, place in a 300°F oven for 10-15 minutes until just warmed through—microwaving tends to make the pears too soft and the nuts lose their crunch. I’ve found that a light drizzle of fresh honey just before serving revives any leftover pears beautifully.
Troubleshooting Common Challenges
Even the simplest recipes can sometimes present unexpected challenges. If your pears are too firm after baking, cover the dish with foil and continue baking in 5-minute increments until tender when pierced with a knife. Conversely, if they’re becoming too soft and losing shape, reduce the temperature and remove as soon as possible. Blue cheese not melting properly? Make sure it’s at room temperature before filling the pears, or choose a creamier variety next time.
For pears that won’t stand upright, create a “nest” of crumpled foil in your baking dish to hold them in place. And if the walnuts are browning too quickly during baking, loosely tent with foil for the remainder of the cook time. Remember that different pear varieties and ripeness levels will affect cooking time, so always check with a knife for tenderness.
Frequently Asked Questions
Can I use different types of cheese instead of blue cheese?
Absolutely! Soft goat cheese adds tangy creaminess, while brie offers luxurious meltability. Mascarpone mixed with a touch of honey creates a sweeter profile perfect for dessert versions. Choose cheeses that melt well and complement the sweetness of the pears.
What’s the best way to tell when pears are perfectly ripe for baking?
The neck of the pear should yield slightly to gentle pressure but not be mushy. For Baked Pears with Berries, Honey, Walnuts & Blue Cheese, slightly underripe pears actually work better as they’ll hold their shape during baking.
Can this recipe be made vegan?
Yes! Replace honey with maple syrup and substitute blue cheese with a dairy-free alternative like cultured cashew cheese. The walnuts and berries are already plant-based, making this an easy recipe to adapt.
How do I prevent the pears from turning brown before baking?
Brush cut surfaces with lemon juice immediately after cutting. The acid prevents oxidation while adding a subtle brightness that enhances the final flavor profile.
Can I prepare these pears in advance for a dinner party?
Prepare the pears up to the point of filling, cover, and refrigerate for up to 8 hours. Add 5 minutes to the baking time if coming straight from the refrigerator to account for the colder starting temperature.
Final Thoughts
These Baked Pears with Berries, Honey, Walnuts & Blue Cheese embody what I love most about cooking—simple ingredients transformed into something truly special with minimal effort. They’ve become my secret weapon for entertaining, that reliable recipe I turn to when I want to impress without stress. There’s something deeply satisfying about presenting a dish that looks like it belongs in a food magazine but actually came together in minutes.
The way the warm pear flesh yields to your fork, releasing its sweet juices to mingle with the melted cheese and honey—it’s a small moment of culinary perfection. I hope these baked pears bring as much joy to your table as they have to mine, whether served as an elegant finale to a dinner party or as a quiet indulgence on a cozy night in. Find more seasonal inspiration on my Pinterest board.