
Desserts
Easter Bunny Coconut Tails Recipe – Irresistibly Fluffy & Fun!
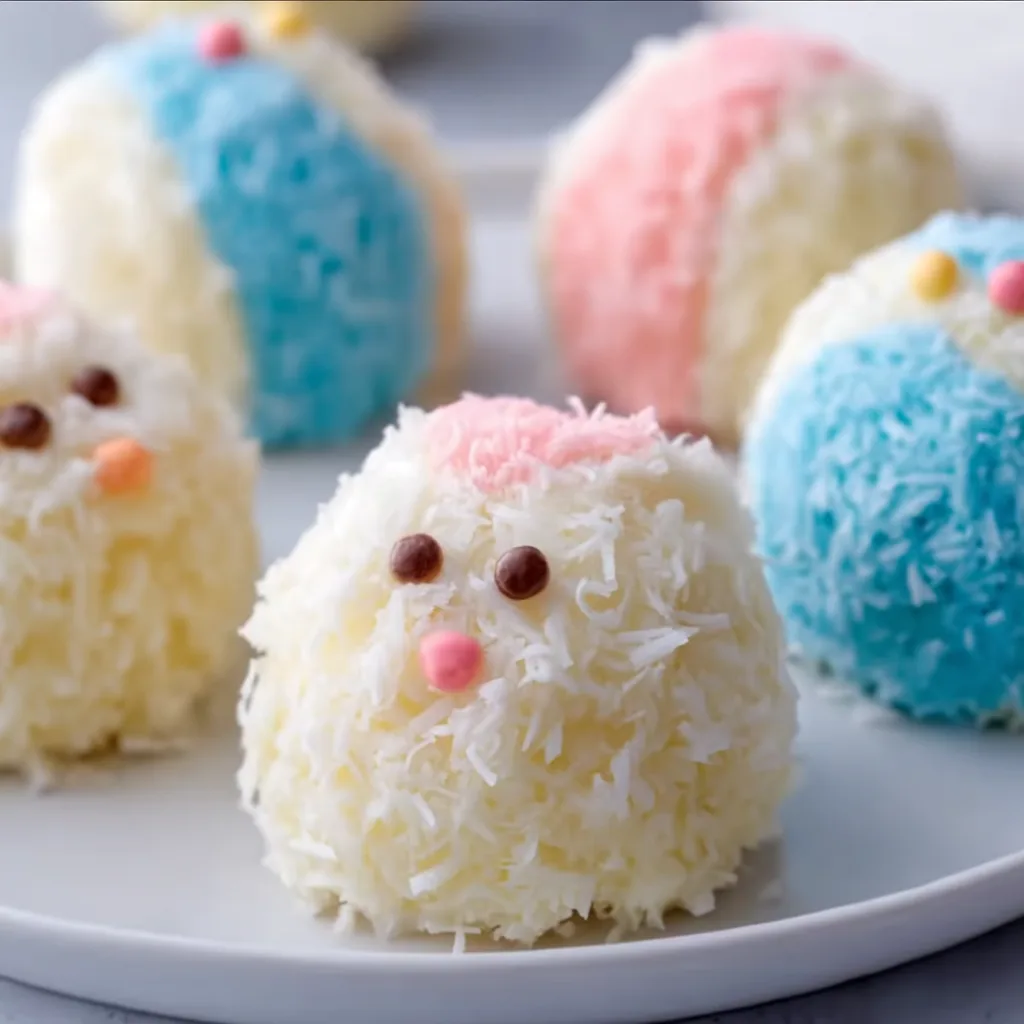
Easter Bunny Coconut Tails have become my absolute favorite springtime treat to share with family and friends. These adorable, sweet confections combine the tropical bliss of coconut with rich chocolate and festive decorations that bring the Easter spirit to life. The first time I made these for my niece’s Easter egg hunt, the children’s eyes lit up with such joy that I’ve made them a tradition ever since. What makes these treats special isn’t just their delicious flavor, but how they transform an ordinary gathering into a magical Easter celebration. The best part? They’re surprisingly simple to create!
Recipe
Why You’ll Love This Easter Bunny Coconut Tails
Perfect Balance of Flavors and Textures
These Easter Bunny Coconut Tails offer the most satisfying texture contrast you can imagine. The exterior coating of shredded coconut provides a delightful chewiness, while the interior remains soft and tender. I love how the sweetness of the coconut paste balances perfectly with the rich chocolate dip. Each bite delivers a wonderful mouthfeel that’s both substantial and delicate. The subtle vanilla notes complement the coconut without overpowering it, creating a treat that even coconut skeptics find irresistible. My husband, who typically avoids coconut desserts, asks for these every spring!
Impressive Yet Easy to Create
Don’t let their adorable appearance fool you – these bunny tails are remarkably beginner-friendly! Unlike complicated Easter desserts that require special equipment or advanced techniques, these cute treats come together with basic ingredients and simple steps. I remember panicking when I volunteered to bring dessert to a family Easter brunch, but these saved the day with just 30 minutes of active preparation. The rolling technique creates perfectly round shapes every time, and the decorating process is forgiving enough that kids can join in. They look professional without requiring professional skills!
Essential Tips & Tricks
Perfecting the Coconut Mixture
The secret to exceptional Easter Bunny Coconut Tails lies in the coconut mixture consistency. I’ve found that chilling the mixture for at least 30 minutes before rolling makes handling infinitely easier. If your mixture feels too wet, gradually add more powdered sugar, one tablespoon at a time, until it reaches a moldable consistency. For extra coconut flavor, replace vanilla extract with coconut extract, or use half of each. When incorporating the shredded coconut, fold gently rather than stirring vigorously to maintain the light texture. This approach has given me perfect results every time I’ve made them for Easter gatherings.
Mastering the Chocolate Coating
Temperature control is crucial when working with the chocolate coating. I learned the hard way that overheated chocolate becomes grainy and unusable! Melt your chocolate in 30-second intervals, stirring between each, until just smooth. Adding a teaspoon of coconut oil to the melted chocolate creates the perfect consistency for dipping. For a cleaner finish, use a fork to dip each coconut ball, tapping gently to remove excess chocolate. If you’re making these in warm weather, place the chocolate-dipped tails in the refrigerator for 5 minutes before adding decorations to prevent smudging your creative designs.
Serving Ideas & Creative Variations
Festive Presentation Techniques
Transform these treats into a showstopping Easter display with thoughtful presentation touches. Arrange your Easter Bunny Coconut Tails in small paper cupcake liners and place them in a basket lined with colorful Easter grass. For an elegant table centerpiece, create a “bunny garden” by inserting toothpicks into the tails and anchoring them in a block of floral foam covered with artificial moss. I love adding fresh spring flowers around the display for a natural touch. For children’s parties, create individual favor bags with two or three tails tied with pastel ribbons. These presentations elevate the treats from simple sweets to memorable Easter moments.
Exciting Flavor Twists
While traditional Easter Bunny Coconut Tails are delicious, experimenting with flavor variations keeps this recipe fresh year after year. Try infusing the coconut mixture with a tablespoon of lemon zest for a bright, citrusy version that pairs beautifully with spring teas. For chocolate lovers, fold mini chocolate chips into the coconut mixture before rolling. My personal favorite variation includes a teaspoon of almond extract and finely chopped dried cherries for sophisticated flavor. For a tropical twist, replace some of the liquid with pineapple juice and decorate with tiny pieces of dried pineapple “ears” to create bunny-pineapple hybrids that children find absolutely hilarious.
Storage & Troubleshooting Guide
Proper Storage Techniques
To maintain the perfect texture of your Easter Bunny Coconut Tails, proper storage is essential. Store finished tails in an airtight container in the refrigerator, where they’ll keep beautifully for up to one week. Place parchment paper between layers to prevent sticking. If you need to make them further in advance, these treats freeze exceptionally well! Simply place fully set tails in a freezer-safe container with parchment between layers and freeze for up to three months. When ready to serve, thaw overnight in the refrigerator, then let stand at room temperature for 20 minutes for the best flavor and texture experience.
Solving Common Problems
Even experienced bakers encounter challenges! If your coconut mixture is too crumbly to form balls, add a teaspoon of milk or cream until it reaches the right consistency. Conversely, if your mixture is too sticky, refrigerate it longer or roll your hands in powdered sugar before forming each ball. For chocolate coating that’s hardening too quickly, add an additional half-teaspoon of coconut oil to extend working time. If decorations won’t adhere to the chocolate, your coating may have set too firmly—try gently pressing decorations into the chocolate immediately after dipping, or add a tiny dot of melted chocolate as “glue” for each decoration.
Frequently Asked Questions
Can I make Easter Bunny Coconut Tails without sweetened condensed milk?
Yes! Substitute 4 ounces of cream cheese (softened) mixed with ¼ cup honey or maple syrup. This alternative provides the right consistency while maintaining the sweetness needed for authentic flavor.
How do I prevent the coconut from falling off the Easter Bunny Coconut Tails?
Roll the formed balls in slightly dampened hands before coating in coconut. The moisture helps the coconut adhere better, and a gentle pressing motion secures the coconut in place.
Can I make these dairy-free?
Absolutely! Use coconut condensed milk instead of regular, and select dairy-free chocolate for dipping. The results are equally delicious and perfect for guests with dairy sensitivities.
What’s the best coconut to use for this recipe?
I recommend unsweetened shredded coconut for the coating and sweetened coconut for the mixture. This balance provides the perfect sweetness level and creates the most authentic texture.
How far in advance can I make these for an Easter party?
You can prepare Easter Bunny Coconut Tails up to 3 days ahead and store them in the refrigerator. For the freshest presentation, add any delicate decorations the day of serving.
Final Thoughts
Easter Bunny Coconut Tails bring together everything I love about holiday baking—simplicity, deliciousness, and that magical ability to create lasting memories. The joy on everyone’s faces when they spot these adorable treats on the Easter table makes every minute of preparation worthwhile. Whether you’re a seasoned baker or trying your hand at homemade Easter treats for the first time, these coconut tails deliver both impressive results and genuine happiness. I hope they become a beloved tradition in your home, just as they have in mine. Happy Easter baking, friends!
Check out more festive recipes on Pinterest!