
Garlic Parmesan Cheeseburger Bombs are the ultimate comfort food mash-up that’s stolen my heart (and taste buds)! These golden-brown bundles of joy combine everything we love about cheeseburgers with the irresistible pull of fresh-baked bread and the savory punch of garlic and parmesan. I discovered these little miracles last game day when I needed something beyond the usual chips and dip, and my kitchen has never been the same. The moment you bite through that buttery, garlic-parmesan crust into the juicy, cheesy center, you’ll understand why these have become my family’s most requested treat. Trust me, these bombs are about to become your new obsession.
Table of Contents
Recipe
Print
Garlic Parmesan Cheeseburger Bombs: Irresistible Flavor Explosion!
- Total Time: 33 minutes
- Yield: 8 bombs
Description
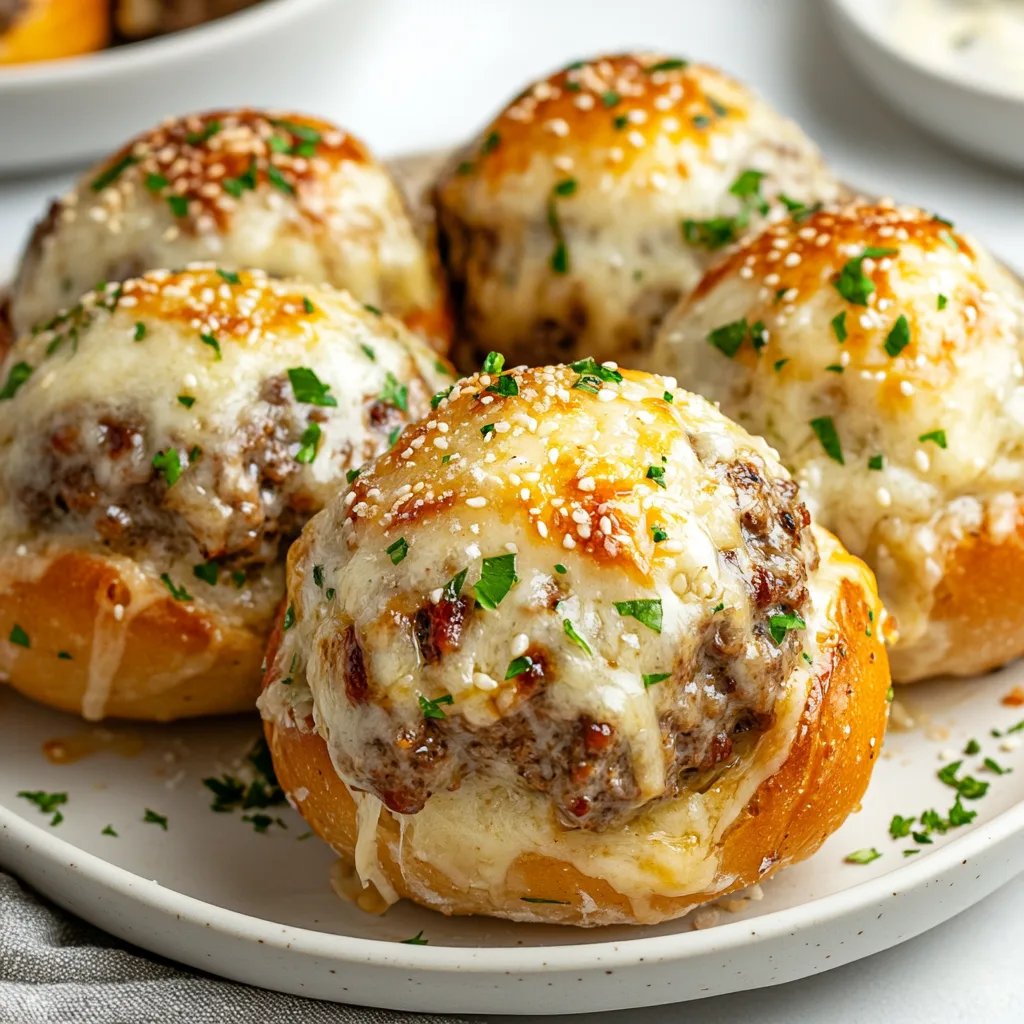
These Garlic Parmesan Cheeseburger Bombs are golden, flaky biscuit pockets stuffed with seasoned beef, melty cheddar, and brushed with rich garlic-parmesan butter. Crispy outside, juicy inside—perfect for game day, parties, or a fun family dinner.
Ingredients
1 lb ground beef
1/2 small onion, finely chopped
1/2 tsp salt
1/4 tsp black pepper
1 tbsp ketchup
1 tbsp mustard
1 cup shredded cheddar cheese
1 can refrigerated biscuit dough (8 count)
**Garlic Parmesan Butter:**
3 tbsp melted butter
1 clove garlic, minced
2 tbsp grated Parmesan
1 tsp dried parsley
Instructions
1. Preheat oven to 375°F (190°C). Line a baking sheet with parchment.
2. In a skillet, cook ground beef and onion over medium heat until browned. Drain fat.
3. Stir in salt, pepper, ketchup, and mustard. Let cool slightly.
4. Flatten each biscuit into a 4-inch round.
5. Place 1–2 tablespoons of beef mixture and some cheese in the center of each.
6. Fold edges up and pinch to seal tightly into a ball.
7. Place seam-side down on baking sheet.
8. Mix melted butter, garlic, Parmesan, and parsley in a bowl.
9. Brush tops of bombs with garlic butter.
10. Bake for 15–18 minutes until golden brown. Brush with extra butter if desired.
11. Serve hot with ketchup, mustard, or dipping sauce.
Notes
Swap cheddar for pepper jack for a spicy kick.
Make ahead: Prep and refrigerate unbaked bombs up to 24 hours.
Add pickles or bacon bits inside for extra burger vibes.
- Prep Time: 15 minutes
- Cook Time: 18 minutes
- Category: Appetizer, Snack, Game Day
- Method: Baked
- Cuisine: American
Why You’ll Love These Garlic Parmesan Cheeseburger Bombs
Perfect Party Food That Disappears Fast
There’s something magical about serving food that creates an instant reaction. Every time I set down a platter of these Garlic Parmesan Cheeseburger Bombs, they’re gone in minutes! The handheld size makes them perfect for casual gatherings, and they stay remarkably warm even after sitting out. Last Super Bowl, my brother-in-law (who claims to be a food snob) ate seven of these before asking for the recipe. The combination of familiar cheeseburger flavors wrapped in that aromatic garlic-parmesan coating creates an irresistible pull that has guests circling back to the appetizer table again and again.
Customizable For Every Taste Preference
What I adore about these Garlic Parmesan Cheeseburger Bombs is how easily they adapt to different preferences. The basic formula stays the same, but you can switch up the filling to suit anyone’s taste. Use ground turkey for a lighter option, or plant-based meat for vegetarian friends. My daughter prefers hers with extra pickles and a touch of mustard mixed into the meat, while my husband loves adding jalapeños for heat. You can even prepare different variations in the same batch—just mark them with different garnishes on top! This flexibility makes them perfect for families with picky eaters or gatherings with diverse dietary needs.
Essential Tips & Tricks
Mastering The Perfect Dough Seal
The secret to exceptional Garlic Parmesan Cheeseburger Bombs lies in creating a proper seal. After filling your dough portions, pinch the edges firmly then roll between your palms to ensure there are no openings where cheese could escape. I learned this the hard way after my first batch leaked all over the baking sheet! For extra insurance, I place each bomb seam-side down on the baking sheet. The dough should feel slightly tacky but not sticky—if it’s too dry, it won’t seal properly; too wet, and it becomes unmanageable. Let the filled bombs rest for 5-10 minutes before baking to help the dough relax and create a more secure seal.
The Secret To That Irresistible Garlic-Parmesan Coating
The garlicky, cheesy exterior is what transforms these from ordinary stuffed bread to crave-worthy bombs. For maximum flavor, I combine melted butter with fresh minced garlic (never the jarred stuff for this!), a touch of Italian seasoning, and finely grated parmesan—the kind that’s almost powdery works best here. Brush this mixture generously over the bombs just before they go into the oven, then again halfway through baking. This double application ensures that gorgeous golden crust with concentrated flavor in every bite. For an extra special touch, sprinkle with a bit more parmesan during the last two minutes of baking for a crispy, cheesy finish that’s simply irresistible.
Serving Ideas & Creative Variations
Perfect Pairings For A Complete Meal
While Garlic Parmesan Cheeseburger Bombs are spectacular on their own, pairing them with complementary sides elevates them to a complete meal. I love serving them alongside a crisp garden salad dressed simply with vinaigrette to balance the richness. For casual gatherings, arrange them on a platter with small bowls of ketchup, mustard, and special sauce for dipping. When I’m feeling fancy, I’ll add a tomato-basil soup for dunking—the acidity cuts through the richness perfectly. For game day spreads, these bombs fit right in with sweet potato fries, coleslaw, or even a platter of roasted vegetables for a more balanced approach.
Creative Twists On The Classic Recipe
Don’t be afraid to experiment with different flavor profiles! My pizza bomb variation uses the same technique but swaps the burger filling for pepperoni, mozzarella, and a spoonful of marinara. The Mediterranean version with ground lamb, feta, and oregano earned rave reviews at my last book club. For breakfast bombs, try filling them with scrambled eggs, cheese, and breakfast sausage—they’re perfect for meal prep! My personal favorite twist is the Philly cheesesteak bomb with thinly sliced steak, sautéed peppers and onions, and provolone. The beauty of this recipe is its versatility—once you master the technique, you can create endless variations to suit any occasion.
Storage & Troubleshooting Guide
Make-Ahead And Freezer Instructions
These Garlic Parmesan Cheeseburger Bombs are perfect for planning ahead! You can prepare them up to the point of baking, then refrigerate for 24 hours covered with plastic wrap. Just add a few extra minutes to the baking time when cooking from cold. For longer storage, freeze the unbaked bombs on a baking sheet until solid, then transfer to a freezer bag for up to 3 months. No need to thaw before baking—just place them on a baking sheet, brush with the garlic butter, and add about 5-7 minutes to the baking time. I often make a double batch specifically to freeze half, giving me a quick dinner option on hectic weeknights.
Solving Common Cheeseburger Bomb Problems
If your bombs are leaking cheese during baking, your seals probably need work. Make sure to pinch the dough thoroughly and roll between your palms to create a tight seal. For extra insurance, let them rest seam-side down for 10 minutes before baking. Pale, soggy bottoms usually mean your oven temperature is too low or the bombs are placed too high in the oven—try using the lower rack and checking your oven temperature with a separate thermometer. If the exterior browns too quickly while the inside stays doughy, your oven is likely too hot. Cover them loosely with foil after they reach your desired color, then continue baking until completely done.
Frequently Asked Questions
Can I use store-bought dough for Garlic Parmesan Cheeseburger Bombs?
Absolutely! Refrigerated biscuit or pizza dough works perfectly. Just divide each biscuit in half or cut pizza dough into 3-inch squares. The flavor won’t be identical to homemade, but it’s a great time-saving option.
How do I know when my cheeseburger bombs are fully cooked?
They should be golden brown with an internal temperature of 160°F. If you don’t have a thermometer, cut one open—the dough should be cooked through with no raw spots, and the meat filling should be completely done.
Can I make these with raw meat or should it be pre-cooked?
Always pre-cook your meat filling. Raw meat won’t fully cook inside the dough before the exterior burns. Cook the meat with your seasonings, drain excess fat, then cool slightly before filling.
Are Garlic Parmesan Cheeseburger Bombs spicy?
Not unless you add spicy ingredients! The base recipe is savory but mild. Add diced jalapeños, red pepper flakes, or hot sauce to the meat mixture if you prefer heat.
How can I make these healthier?
Use lean ground turkey or chicken, reduced-fat cheese, and whole wheat dough. You can also brush with olive oil instead of butter and add extra vegetables to the filling.
Final Thoughts
Garlic Parmesan Cheeseburger Bombs have become my go-to recipe whenever I need guaranteed smiles around the table. There’s something magical about the way they combine familiar flavors into an exciting, handheld package that delights everyone from picky kids to discerning foodies. The aroma that fills your kitchen as they bake is worth making them for that alone! Whether you’re feeding a crowd or just looking for something fun to shake up your dinner routine, these bombs deliver big flavor in every bite. I hope you’ll give these Garlic Parmesan Cheeseburger Bombs a try and experience the joy they bring to any table! Find more delicious recipes on Pinterest.