
No-Bake Peanut Butter Marshmallow Squares have been my go-to treat since I discovered them during a summer power outage when baking was impossible. There’s something magical about the way creamy peanut butter envelops those pillowy marshmallows, creating squares that are simultaneously chewy, crunchy, and utterly irresistible. I love watching friends’ eyes light up when they bite into these nostalgic treats. The best part? You can whip these up in minutes without turning on your oven, making them perfect for hot summer days or last-minute gatherings when you need something sweet and impressive.
Table of Contents
Recipe
Print
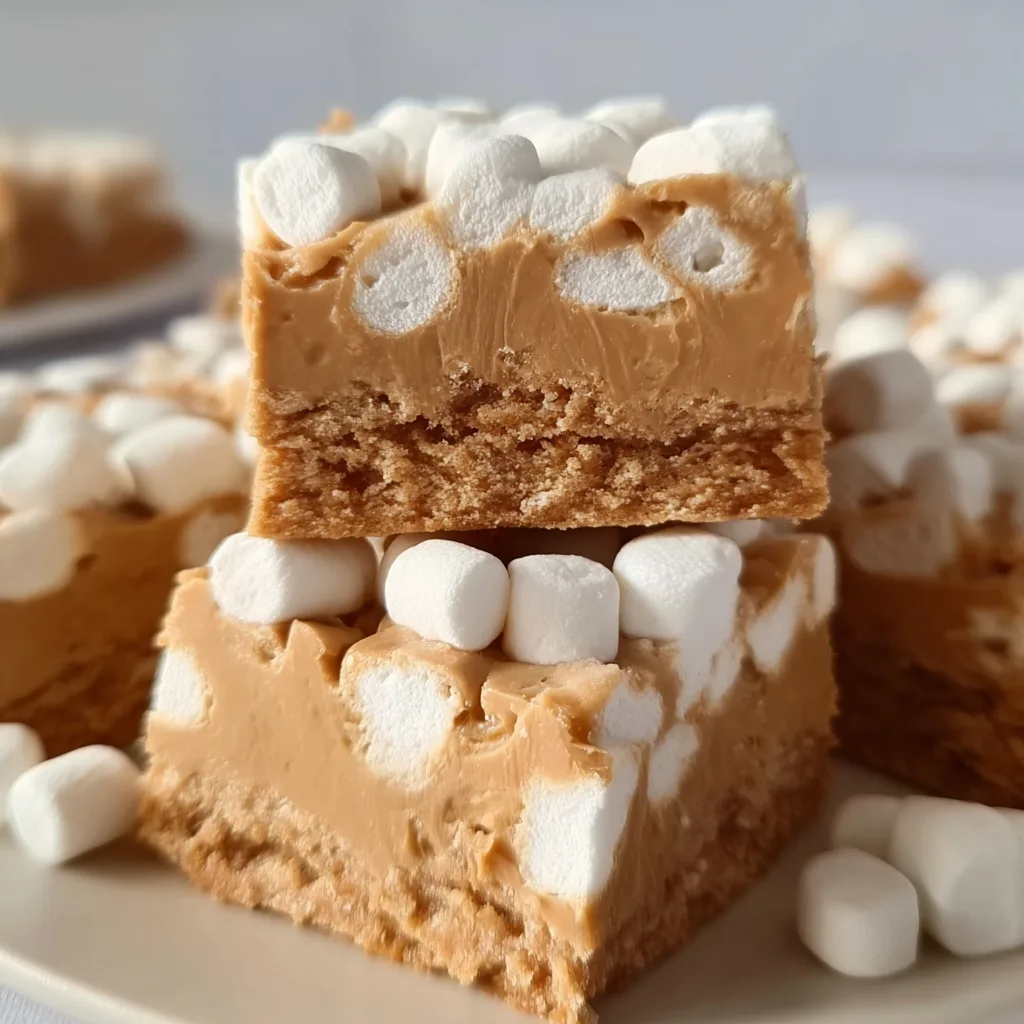
No-Bake Peanut Butter Marshmallow Squares
- Total Time: 15
- Yield: 16 squares
- Diet: Vegetarian
Description
These No-Bake Peanut Butter Marshmallow Squares are rich, gooey, and loaded with nostalgia. With just 5 ingredients and zero oven time, they’re the perfect quick treat for parties, holidays, or anytime cravings hit!
Ingredients
1/2 cup unsalted butter
1 cup creamy peanut butter
1 (11 oz) bag butterscotch chips
1/2 teaspoon vanilla extract
4 cups mini marshmallows (preferably fresh)
Instructions
1. Line an 8×8-inch pan with parchment paper or grease lightly.
2. In a saucepan over low heat, melt butter, peanut butter, and butterscotch chips, stirring until smooth. Remove from heat.
3. Stir in vanilla extract and let mixture cool for 5–10 minutes (important so marshmallows don’t melt).
4. Gently fold in mini marshmallows until fully coated.
5. Pour mixture into prepared pan and press lightly to spread evenly.
6. Refrigerate for 2–3 hours or until set.
7. Slice into squares and serve chilled or at room temperature.
Notes
• Let mixture cool before adding marshmallows to keep them whole.
• Use colorful marshmallows for a fun twist.
• Store in an airtight container in the fridge up to 1 week.
- Prep Time: 10
- Cook Time: 5
- Category: Dessert
- Method: No-Bake
- Cuisine: American
Why You’ll Love These No-Bake Peanut Butter Marshmallow Squares
Perfect Balance of Flavors and Textures
These squares hit all the right notes with their perfect texture contrast between the crispy cereal, velvety peanut butter, and soft marshmallows. I still remember making these with my daughter during her first sleepover party—the girls couldn’t believe something so delicious could be made so quickly! The subtle saltiness from the peanut butter balances the sweetness of marshmallows and chocolate, creating that addictive sweet-and-salty combination that keeps everyone reaching for “just one more piece.” Plus, the satisfying chew factor makes each bite a delightful sensory experience.
Quick and Accessible for Any Occasion
What I adore most about these squares is their incredible convenience. With just 5-6 pantry staples and about 15 minutes of active time, you’ve got a crowd-pleasing dessert that looks like you spent hours in the kitchen. Last Christmas, when my oven unexpectedly quit working, these squares saved our holiday gathering! They’re perfect for busy weeknights, potlucks, bake sales, or anytime you need a reliable treat that won’t let you down. Even kitchen novices can nail this recipe on the first try—it’s virtually foolproof.
Essential Tips & Tricks
Mastering the Perfect Consistency
The secret to success lies in properly melting your peanut butter mixture. Heat it gently—either in a heavy-bottomed pot on low heat or in 30-second microwave bursts—stirring frequently to prevent scorching. You want it warm and fluid but not bubbling hot, which could melt your marshmallows too quickly. I learned this the hard way during a summer picnic prep when I rushed and overheated the mixture! For extra creamy results, remove from heat completely before folding in marshmallows and cereal, allowing the residual warmth to gently coat everything without melting the delicate ingredients.
Ingredient Swaps That Always Work
Don’t stress if you’re missing an exact ingredient—these squares are wonderfully adaptable. Crunchy peanut butter creates a delightful texture variation if you prefer some nutty bits. No Rice Krispies? Graham cracker crumbs, crushed cornflakes, or even broken pretzel pieces work beautifully. For a more decadent version, fold in mini chocolate chips once the mixture has cooled slightly. I’ve even made these for my lactose-intolerant neighbor using dairy-free chocolate chips and coconut oil instead of butter—she couldn’t believe how delicious they were!
Serving Ideas & Creative Variations
Elegant Presentation Options
Transform these humble squares into an impressive dessert with minimal effort. Cut them into perfect cubes and arrange on a wooden board with fresh berries for a beautiful contrast. For special occasions, I like to drizzle melted white chocolate in a zigzag pattern across the top, then sprinkle with crushed freeze-dried raspberries for a pop of color and flavor. Last Valentine’s Day, I used a heart-shaped cookie cutter for the cutest presentation that had my husband sneaking extras from the fridge all week! These also look stunning served on individual dessert plates with a small scoop of vanilla ice cream.
Seasonal and Holiday Adaptations
These versatile squares can be easily customized for any holiday or season. For Halloween, fold in orange and black sprinkles or candy pieces. Christmas calls for crushed candy canes and green sprinkles. For summer picnics, I love adding dried cranberries and a hint of orange zest to brighten the flavor profile. My personal favorite variation came about during fall when I swapped regular peanut butter for cookie butter and added cinnamon—the warm spice notes were absolutely divine! You can also press the mixture into themed silicone molds instead of a pan for holiday-shaped treats.
Storage & Troubleshooting Guide
Keeping Them Fresh and Delicious
These squares maintain their best texture when stored properly. Keep them in an airtight container with parchment paper between layers to prevent sticking. At room temperature, they’ll stay fresh for 3-4 days, though they rarely last that long in my house! For longer storage, refrigerate for up to a week—the chilled texture creates an almost fudge-like consistency that’s equally delicious. I discovered by accident that freezing works beautifully too; just thaw for 15 minutes before serving. For summer potlucks, I keep them in a cooler with ice packs to maintain their perfect chewy-crispy balance.
Fixing Common Issues
Even experienced bakers encounter occasional hiccups, but most problems with these squares are easily fixable. If your mixture seems too dry or crumbly when mixing, add a tablespoon more melted butter or peanut butter. Too sticky to cut cleanly? Refrigerate for 30 minutes, then use a knife dipped in hot water and wiped dry between cuts. If your squares didn’t set properly, they likely needed more cooling time—pop them in the fridge for an hour. I once salvaged a batch that wouldn’t hold together by pressing the mixture into muffin tins and creating individual cups instead!
Frequently Asked Questions
Can I make No-Bake Peanut Butter Marshmallow Squares ahead of time?
Absolutely! Make them up to 3 days in advance and store in an airtight container. They actually develop even better flavor after sitting overnight in the refrigerator.
What’s the best peanut butter to use?
Commercial creamy peanut butter (like Jif or Skippy) works best as it has stabilizers that help the squares set properly. Natural peanut butter can separate and affect the texture.
Can I make these allergy-friendly?
Yes! Substitute sunflower seed butter or almond butter for peanut butter. Use gluten-free cereal if needed, and vegan marshmallows for a vegetarian version.
Why did my squares turn out too hard?
You likely overcooked the sugar mixture or used too little marshmallow. Gentle heating and proper measurement of ingredients prevent this issue.
How do I know when they’re ready to cut?
They should feel firm but slightly yielding when pressed with a finger. If they’re still tacky, they need more cooling time—usually at least 2 hours.
Final Thoughts
No-Bake Peanut Butter Marshmallow Squares remain one of my most treasured recipes because they embody what I love most about cooking—creating joy through simplicity. They’ve been there for last-minute school treats, power outage emergencies, and countless happy moments around my kitchen table. The way they bring together nostalgic flavors in an effortless package makes them truly special. I hope these squares become a beloved staple in your recipe collection too, ready whenever you need a foolproof treat that always delivers smiles. Don’t forget to share your creations on Pinterest!